This article will show you multiple ways to scan and email your documents. We’ll show you various techniques, such as:
- How to use your printer’s scan to email function
- How to scan from your computer
- How to scan with your phone
- How to attach your document to an email
We’ll also show you how to transform your document into a digital document that you and your recipient can sign online.
Let’s get started.
Should You Use the Scan to Email Feature of Your Printer?
Scanning to email may look like a quick and effective way to scan a document and send it online. And it is, just not for every document and recipient.
One of the main disadvantages of using the “scan to email” feature is the risk that the document won’t reach its recipient.
When you’re using the “scan to email” feature, it’s harder to check that the email address you’re entering is correct because you may not receive an error message if you entered it incorrectly. You won’t receive any warning if the intended recipient has changed their email address or if their inbox is full.
Recipients also can’t reply to a message delivered from a printer as the return email address will show as a “no-reply” address. You can rarely customize your message, and you won’t hear back from recipients if they try to contact you using the email address on the message.
If you want to use the “scan to email” feature, you should only do it when you can personally confirm that the email reached its destination, and you should only use this function with documents that aren’t very important as they might not get through on the first try.
So, what should you do instead?
The Better Alternative: How to Scan to Email a Document (+ Sign it or Request a Signature) in a Safe and Handy Way
Here are a few ways to scan, email, and even sign a document online without using the “scan to email” feature:
Scan Your Document
Here’s how to scan your document using any scanner or multifunction printer:
How to Scan on Windows
Windows has a built-in method for scanning documents, so you don’t need to use a different app or software to do it.
Here’s how:
- Open the Start menu
- Find the Scan app and click on it to open it. If you can’t find it, you can search for it using the search tool in the bottom left corner.
- Once you’ve opened the Scan app, it’ll tell you if your scanner isn’t connected, in which case you’ll have to check that the scanner is on and properly plugged in.
- Select the scanner you’ll be using from the list and the file type you’ll be saving your scans. If you just want an image, PNG and JPEG are very common formats.
- To start scanning, place your document in the scanner facing down, then go to Show More > Preview to look at the document early.
- You can also change the image’s settings (such as color or grayscale modes and image resolution) by using the “Show More” function.
- Wait until the scanner finishes scanning your document as a preview and displays the document on the screen. If the document is misaligned or misplaced, fix its position in the scanner and preview it again.
- Once you’re happy with the positioning, you can select the area you want to scan by clicking and dragging across it. Once you’ve selected the area you want to scan, click on “Scan”.
- Repeat this process with every page you want to scan.
- Wait until the scan is ready, and you’ll have your document successfully digitized.
Remember to save your document in a folder you’ll remember. To make things easy, you can also save it on your Desktop so you won’t miss it.
How to Scan on a Mac
Your Mac computer also has a preprogrammed tool for using your scanner. Here’s how to use it:
- Prepare your documents.
- Open the Preview app.
- Go to File > Import From Scanner, and select your scanner.
- If you don’t see your scanner listed, make sure the scanner is turned on and plugged in.
- You’ll see the “Import” dialog, where the preview scan is being prepared.
- You can now choose your scanning options. If desired, change the color, type of document, size, orientation, and other details.
- Click “Scan” to start scanning; the app will let you know when you’ve fully digitized your document.
- Repeat this process with every page you want to scan.
You now have a digitized version of your document. Remember which folder you saved your document in, or save it to your Desktop so you can see it on your screen when you’re done.
How to Scan on iOS
Using the iPhone or iPad’s built-in camera, you can scan your document without a scanner. Here’s how:
- Prepare your document by placing it on a flat surface with good lighting.
- Open the Notes app on your iPad or iPhone.
- Create a new note or select a preexisting note to add a scanned document to it.
- Tap on the camera icon located at the bottom of your screen.
- Tap on “Scan Documents.”
- Aim the camera at the document you want to scan. If your device doesn’t automatically start scanning, tap the shutter button to start.
- Repeat this process with every page.
- Your document is now scanned and saved in your Notes app.
You can share your notes through multiple apps or send them as an email. You can also sign documents on your iPhone, by the way.
How to Scan on Android
Android doesn’t have a built-in app dedicated to scanning documents. However, you can scan your document by using Google Drive.
Here’s how:
- Prepare your document by placing it on a flat surface with good lighting.
- Open the Google Drive app, and tap on the “+” icon in the bottom-right corner of the screen to create a new document, then select “Scan.”
- Aim the camera at your document, align it, and take a shot.
- Check your preview, cropping it and adjusting the settings as you see fit, or scan the document again by tapping “retake.”
- Repeat this process with every page.
- Your document is now scanned and saved in your Google Drive account.
You can share your new document through a link or add people’s email addresses to access it. You can also sign documents on Android.
Email Your Document and Request a Signature (or Sign It)
Here’s the best way to get your digitized document signed online:
Use Electronic Signature Software

Once you have digitized your document, you’ll have a few options to get it signed. A free and simple way is by requesting a signature through an online signature app such as Signaturely.
Signaturely is a simple and effective digital signature software that allows you to create online signatures and online documents with legal validity. With Signaturely, your signees won’t need to be at the same place to sign a document. Instead, they can sign it online with their phone, tablet, or laptop.
Signaturely allows you to create e-signatures for free without any registration. This allows you to sign your document online and share it with multiple people.
Here’s how:
- Create an account on Signaturely for free
- Open your account and select the names of those who need to sign the document.
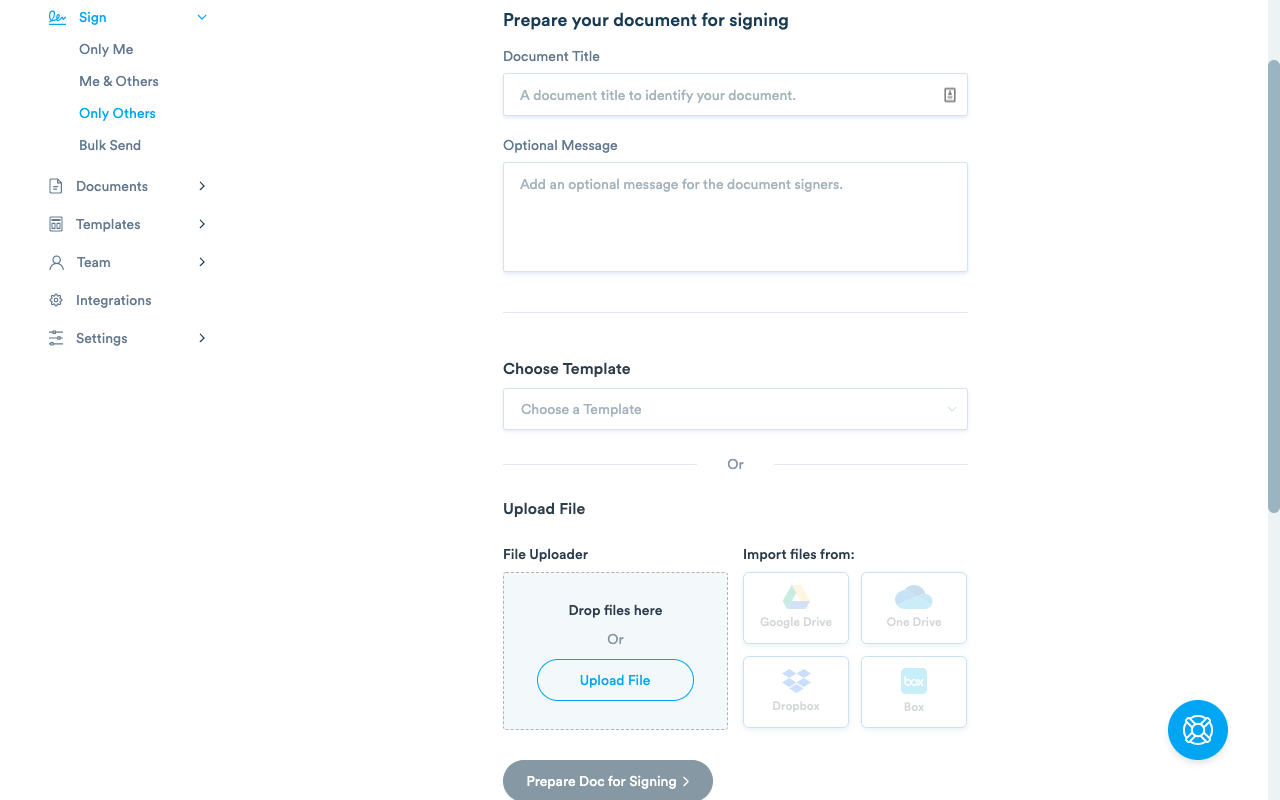
- Prepare your document by adding a title and a customized message to the people who will be signing it:
- Scroll down and select how you’ll add your files. You can select files from an online platform, like your Google Drive account, or upload them from your computer.
- Open your document and add signature fields to it with the online editor.
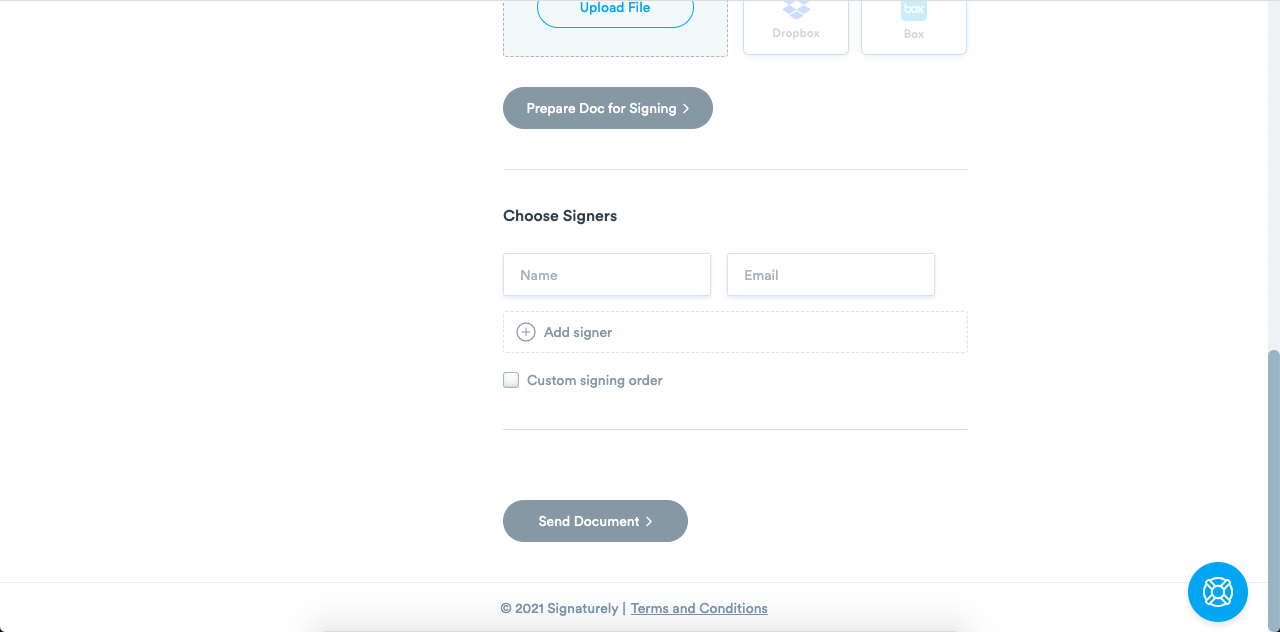
- Enter the signers’ names and email addresses. You can also select an order for them to sign it in, and Signaturely will send the documents to users in the preselected order:
- Review your information and click “Send Document”.
Once you’ve sent the document, you can track it with your Signaturely account. This way, you can see if a recipient takes too long to sign. If someone’s taking too long, you don’t have to call them. You can simply notify them to remind them that their signature is required.
Once your signers receive the document, Signaturely will guide them through the signing process, helping them create their own signature and going through each signature field until they’re done.
Pros:
- Very easy to use
- Professional and personalized
- Works on any device
- It keeps you in control of the process
- Guides you and your signers through every step
- You can start for free
Cons:
- No mobile app available (currently in development)
Use Your Email Client
You can also choose to use your email client to email a document. Keep in mind that if you need to sign the document, you’ll have to sign it before you send it by either physically signing it or using an electronic signature.
Here’s how to send your document:
- Open your email account.
- Select “New Message” to start writing a new email.
- Within the new email window, search for an “add attachment” symbol. It usually looks like a paper clip.
- After clicking on it, find your file, select it, and press “Enter.”
- You can also drag the scanned file and drop it into the window.
- Finish writing your message and add the recipients’ email addresses.
- You can now send your email with the attached scanned file.
Pros:
- Easy to use
- Free to use
- You can do it from your phone
Cons:
- It doesn’t tell you who has signed and who hasn’t
- You may need to print and sign the document first and ask your signers to do the same
- Slower process
- Not as professional as using a specialized platform
FAQ: Scan to email
Here are the answers to the most common questions about emailing scanned documents.
When you’re using the “scan to email” printer option, you don’t need to use any other software to send your scanned image. However, you also lack all the functionality of sending an email, like adding a message, making sure the email arrives, and editing your image before sending it.
Not necessarily. When you use the “scan to email” function, you can’t be certain if the email was sent appropriately unless you have access to the email address yourself. Also, multifunction printers send emails in clear text by default. These may be intercepted by third parties who are also connected to the same WiFi network as your printer. This is why you should only use your printer’s “scan to email” function for non-confidential documents that you can verify were sent properly.
You can send up to 999 scanned pages. This number will likely depend on the memory and capacity of your printer.
You can use Gmail’s confidential mode if you want extra security to keep your confidential information safe from unauthorized access. With it, you can set an expiration date for messages and even revoke access to them. Your recipients cannot copy, forward, print, or download the message.
How do I scan from printer to email?
- Open your scanning app.
- Scan your document.
- Save it.
- Look up your document.
- Right-click on it.
- Select “Share” and then “Mail”.
- Compose your email.
- Send your email.
How do I email documents?
- Open your email account.
- Start composing a new message.
- Drag and drop your document into your email.
- Check your information and add your recipient’s email address.
- Click “Send.”
How do I write an email with an attachment?
- Go to your email account.
- Select “New message.”
- Look for a paperclip icon and click on it to attach a file.
- Look for the file in your computer’s folders. Once you find it, click on “Open” or “Choose file.”
- Continue writing the email.
- Add a subject line and the email address of the person you want to send it to.
- Click “Send” when you’re ready to send your email.
Scan to Email Conclusions
As we saw, there are multiple ways to scan your documents. From multifunction printers to your iPhone and Android phone, you can scan and send your documents online, wherever you are.
And if your documents require signatures, you can always collect legally-binding signatures with Signaturely for free.
Signaturely will help you transform your scanned documents into documents ready to be signed by all parties. It’ll then guide your signers through the signature process, keeping you updated as they go.
Try Signaturely for free today.


