



To add a signature in Google Docs, open Insert > Drawing > New, choose Line > Scribble, draw your name and click Save and Close. You can also upload an image of your signature, use Google’s built-in eSignature tool on eligible Workspace plans, or sign through an add-on such as Signaturely.
The right method depends on whether you only need your own mark on a document or need trackable signatures from other people.
| Method | Best for | Needs |
|---|---|---|
| Drawing > Scribble | A quick signature on your own document | Any Google account |
| Uploaded signature image | A clean, reusable signature | A PNG or JPG of your signature |
| Built-in eSignature (Tools > eSignature) | Requesting signatures from up to 10 people | An eligible Google Workspace plan with the feature turned on |
| Signaturely with Google Drive | Signing and collecting signatures on any plan | A Signaturely account |
The sections below cover each method, the phone steps and how to change a signature after you add it.
How to Insert Signature in Google Docs
Google Docs has a base feature that allows you to insert signatures into your documents. It’s a multi-step process that we’ll outline below. On eligible Google Workspace plans, Docs also has a built-in eSignature tool (Tools > eSignature) for requesting signatures from others.
Start by opening the document that you want to sign in Google Docs. Scroll down and find the area where you need to add your signature. Once you’ve found it, click Insert on the top left-hand bar. Then, select Drawing and New from the drop-down menu.
The image below will help you understand the process described.
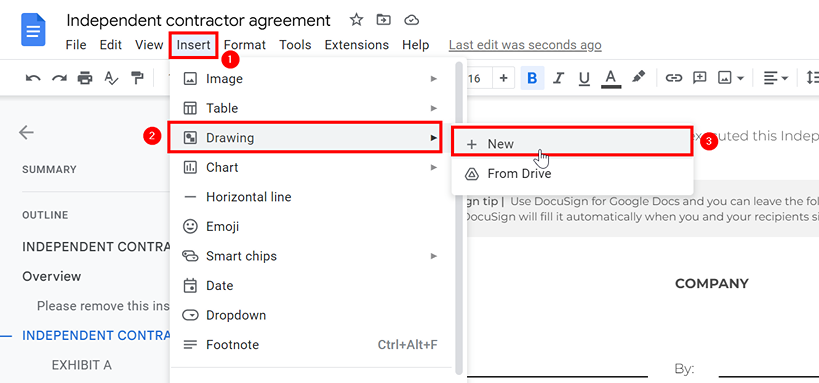
A pop-up interface should appear where you can manually draw or upload your digital signature. You can upload files from your device/computer or your Google Drive if you have one. We’ll draw a signature for the sake of this step-by-step guide.
To draw your signature, click the drop-down menu of the Line symbol/icon. Seven options should appear: Line, Arrow, Elbow Connector, Curved Connector, Curve, Polyline, and Scribble. The one that you want to select is Scribble.
Here’s an image to help you understand the process explained.
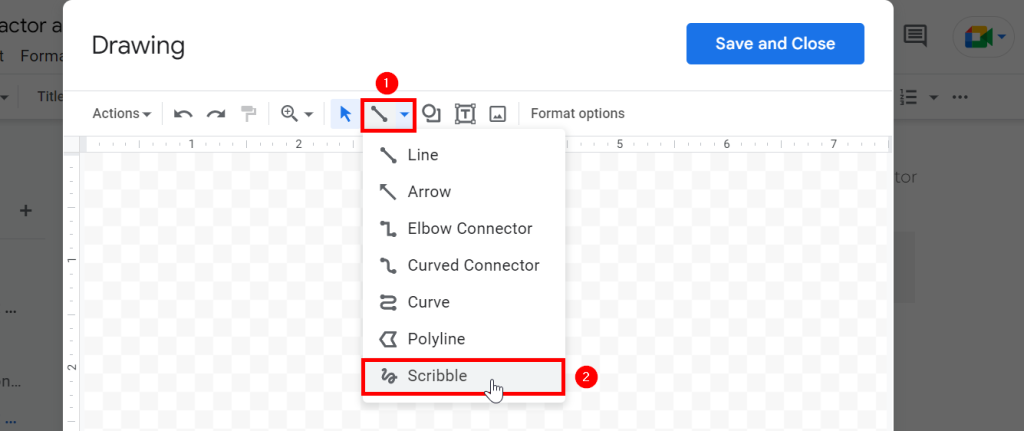
Use your mouse or touchscreen to draw your digital signature. Don’t rush the drawing; make it as accurate and clean as possible. Press Save and Close in the top right-hand corner when you’re done.

Your drawn digital signature will now be added to your Google Docs. It won’t be in the right place, so you must move it. We recommend changing the image settings of your drawn signature by left-clicking your image and selecting In front of text.
This image will provide you with some guidance.

Now all you have to do is simply drag and drop your digital signature in the right place. Here’s how it looks in the image examples:

As mentioned earlier, you can also upload an image of your digital signature from your hardware or Google Drive. Follow the same steps above until you get to the pop-up interface. Instead of drawing, press the Image symbol/icon.
Here’s an image to give you an idea of what it looks like.

An upload file interface should appear. You can upload a file from your device’s hardware or your Google Drive. Press Save and Close when you’ve attached the image file of your digital signature.

Now the image of your digital signature is in your Google document. If it’s transparent, change the text wrapping to In front of the text like the drawn signature method. Use the Behind text option if your signature has a white background.
These manual methods of inserting your signature in Google Docs aren’t tricky, but there are far easier ways. Continue reading below to learn more about these methods.
How to Use the Built-In eSignature Tool in Google Docs
Google Docs has its own eSignature feature for sending signature requests. It is not available on every account. Google’s eSignature help page names the eligible accounts: Workspace Individual, plus Business Standard and Plus, Enterprise Starter, Standard and Plus, Enterprise Essentials and Essentials Plus, and Education Plus when an administrator turns the feature on. If the menu item is missing, ask your administrator or request access.
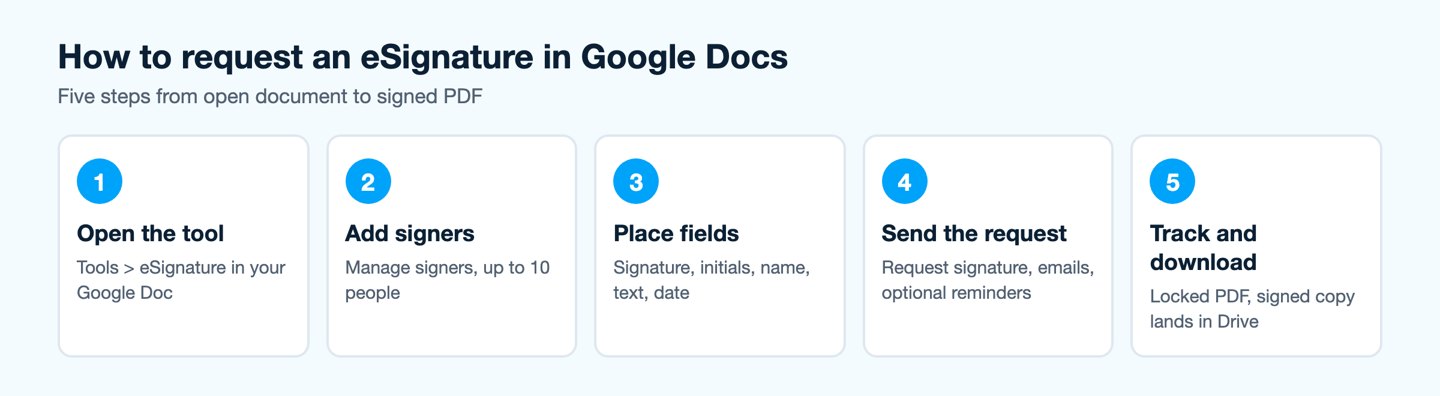
- Open your document and click Tools > eSignature.
- Add the signers with Manage signers. You can add up to 10 signers.
- Drag fields into the document: Signature, Initials, Name, Text field or Date signed. A document can hold up to 200 fields, and each signer gets their own color.
- Click Request signature, enter a title for the PDF, add each signer’s email address and write an optional message.
- Turn on Automatic reminders if you want them. Google sends the first reminder after 3 days and then every 3 days for up to 9 days, or until the document is signed.
After you send the request, Google creates a PDF copy and locks it, so nobody can change the text while people sign. Your original Google Doc stays editable. To change the wording, cancel the request, edit the source document and send a new one.
Signers open the emailed link, fill in any text fields and click their colored fields. They can type their full name, which Google turns into a standard-style signature, or draw it with a mouse, trackpad or touchscreen. They then click Adopt and sign and Mark Complete. Everyone gets a signed PDF copy in Google Drive when the last signer finishes.
Pick the built-in tool if your team already pays for an eligible Workspace plan and you send simple agreements. Pick a dedicated tool such as Signaturely if you are on another plan or want to work from saved documents in Google Drive.
How to Insert a Signature in Google Docs Using Signaturely
The easiest way to insert a signature in Google Docs is to use Signaturely, a digital signature software. It’s a web-based tool that enables you to sign and process contracts and agreements quickly.
There are several benefits to using Signaturely to sign something in Google Docs electronically. For starters, it’s simple and more convenient than other, more complicated processes. You can upload, sign, process, and send secure documents with only an internet connection.
Your documents go straight to your contract parties’ email inboxes, so there is no printing or scanning step.
Signaturely protects documents with encryption and two-factor authentication.
The Google Drive integration is included in the Personal and Business plans. Signaturely is also affordable and offers a free plan. You can upload and sign any Google Doc that you want. The free plan is limited by the number of documents. After the 7-day free trial, you’re allowed 1 document per month.
Using Signaturely to sign a Google document is short and sweet. Begin by visiting the Signaturely website and logging in to your Signaturely account. You can create an account for free if you don’t have one.

Once logged in, you’ll first want to link your Google Drive account with Signaturely. Press “Integrations” on the left side menu. This’ll take you to a page where you can integrate various cloud storage platforms with Signaturely.
You’ll see four options on this page: Google Drive, Dropbox, One Drive, and Box. You’ll want to press the Activate button for Google Drive. Here’s an image to help you understand how this process is done.

An activation widget will be sent where you can select your Google account. You should get a little pop-up interface in the top right corner of the page to confirm that you’ve successfully integrated Google Drive and Signaturely.


Now that you’ve integrated your Signaturely account with Google Drive, it’s time to upload, sign, and process your document. Start by selecting Sign on the sidebar to the left. Then, you’ll be presented with three. Who needs to sign? Options: Only Me, Me & Others, and Only Others.
- Only Me: If your document only needs your signature.
- Me & Others: If your document needs your signature and others’.
- Only Others: If your document only needs others’ signatures.
Select the option that best fits your document needs. Here’s an image to help you understand the process.

You’ll be sent to a document preparation page after you’ve selected the right signing option. Fill out the form fields and then scroll down to the Upload File section. This section is where you can import your document file from Google Drive. Press the Fill Out & Sign button once you’ve attached your document file.

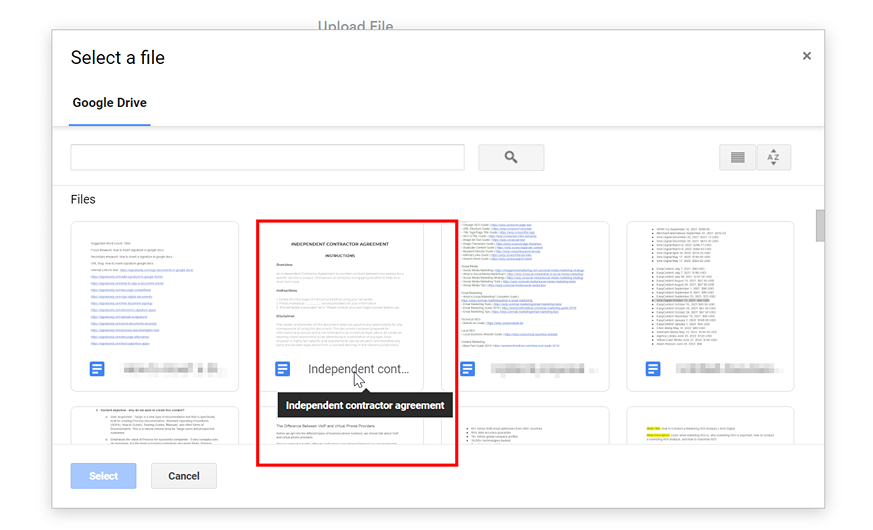
This will send you to a document editor page where you can add your digital signature. You can also add dates and text boxes. Press Send in the top right corner after editing the document.
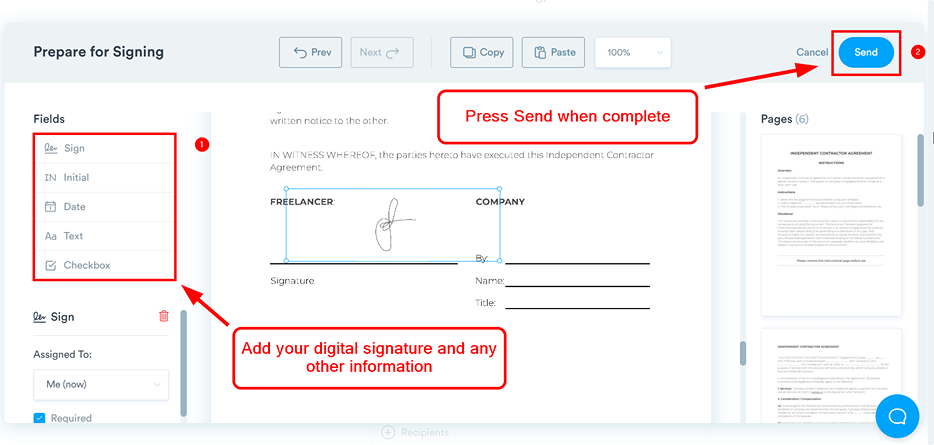

The image examples were for a document that only you need to sign. The process for other contract parties differs slightly. You can assign signer locations where your signatories can add their digital signatures. You’ll also be able to email them a link to the document.
How to Insert a Signature in Google Docs from Your Phone
In many instances, you need to use your phone to sign a document. You might be outside the office, and time is of the essence. Signing a document digitally from your iPhone or Android device ensures a quick turnaround time.
Many individuals don’t have a laptop or desktop computer and must use their phones to sign contracts, forms, and agreements electronically. Although this slightly complicates the process, inserting a signature in Google Docs using a phone is still possible.
You’ll need to download the Google Docs app to insert your digital signature into your Google document. Start by finding your document in your Google Drive. You can do this through a web browser like Google Chrome or the Google Drive app.


You should now have your Google document open. Now, attempt to edit it by pressing the icon in the bottom right corner. Doing this will activate the Google Doc app. Here’s an image to help you understand how to do this.

Now, you’ll have Google Docs activated and be able to edit your Google document. Scroll down to the section of your document that requires your digital signature. Once there, press the Insert symbol/icon, select Image, and then From Photos.


Look for the image of your digital signature and take a photo of it if you haven’t already.

Your digital signature should now be inserted into your Google document.

This is a rather messy and complicated process. You can save time and effort by using Signaturely instead. All you have to do is visit the Signaturely website, log in, and upload and sign your document.
How to Edit Your Signature in Google Docs
You can alter your signature with the image settings on Google Docs if necessary. To do so, click on your signature and press Edit, located beneath it.

This will open the editing page you initially used to create your digital signature. Using the scribble tool, you can attempt to redraw it for a cleaner image. In the drawing editor, the Select tool also lets you move a stroke, and the buttons above the canvas change line color and thickness, as described in Google’s drawings help. You can also replace it with an uploaded image, and you can do that by selecting the Image symbol/icon.

You can tweak several other image options to customize your digital signature. These advanced editing tools allow you to change the following parameters: size and rotation, text wrapping, and position. Here are a few signature ideas if you still don’t have a digital signature.
- Size & Rotation: This allows you to manipulate the width and height of your digital signature.
- Text Wrapping: You can place your digital signature around the text of your document in five different ways. These include the following: Inline with text, Wrap text, Break text, Behind text, and In front of text.
- Position: Changes the position of your digital signature on the page.
Click on your digital signature and select All image options to access and edit these elements. This image will help you to understand how to do it. A sidebar with the three parameters should appear on the right.


That’s all of the built-in customizations that Google Docs offers. An easier way to edit your digital signature is to use Signaturely, and the web-based digital signature tool makes it simple to sign.
Go to the Signaturely website and log in to your account. Then, select Settings on the left-hand menu bar. You’ll want to then select Edit Signature in the submenu that appears. Press the three vertical dot symbols/icons above your image and then choose Edit.
This is where you can modify your existing digital signature or signatures to your heart’s content. Use this image to help guide you through the process.

You’ll then be taken to a signature editor, where you can edit your digital signature by typing, drawing, or uploading a new image file. Hit the Update signature button when you’ve completed editing your digital signature.

That’s all there is to it. Editing your digital signature with Signaturely is easy. It’s the recommended method; it’ll save you time and effort.
Which Way to Sign in Google Docs Should You Use?
There are several ways to sign a document online. For a one-off signature, the Drawing tool is enough. When other people need to sign, use the built-in eSignature tool or Signaturely.
Frequently Asked Questions About Signing in Google Docs
Go to Tools > eSignature if your Workspace plan includes it. On other accounts, use Insert > Drawing > New to draw a signature or Insert > Image to upload one.
Yes, on eligible plans. It lets you add up to 10 signers and fields such as signature, initials, name, text and date, then sends a locked PDF for signing. Workspace Individual and several Business, Enterprise and Education plans are eligible, and administrators can switch it on or off.
Open Insert > Drawing > New, select Line > Scribble, draw your signature and click Save and Close. You can also upload a PNG or JPG of your signature through the Image option in the same dialog.
An electronic signature is any electronic mark that shows intent to sign, such as a drawn name. A digital signature is a type of electronic signature that uses a cryptographic process to prove who signed and that the document was not changed.
Yes. In the Google Docs app, tap the edit icon, then Insert > Image > From Photos and choose a picture of your signature.
Upload a signature saved as a transparent PNG, then set the image to In front of text. If your image has a white background, use Behind text instead.