Signing documents is a crucial workflow for any business, particularly larger ones. Most of this is done online, saving time, effort, and money. You no longer need to print and fax hard copies. However, adding a digital signature to a document online can seem confusing. But don’t worry. We’ve got you covered. In this article, we’ll explain how to electronically sign something by using the following three simple steps:
- Define the platform you’ll use to sign your document electronically.
- Define the type of document you need to have signed.
- Identify an appropriate digital signature method to sign your document.
After reading this guide, you’ll be able to sign any document regardless of its format or the platform you use.
Ready? Let’s get started.
Step 1: Define Which Platform You Will Use To Insert the Electronic Signature
The first step is to select the platform on which to add a digital signature to your document. There are many potential options, and each has its own specificities.
You have computer platforms like Windows, Mac, and Linux. You also have smartphone platforms, like the iPhone and the Android operating system. iPad tablets also exist, running on the macOS operating system.
We’ll outline and provide a brief summary of each platform.
Windows
Windows is the operating system for the majority of PCs in the world. With Windows, you can digitally sign most documents, from PDF to Word, Google Docs, and more. However, signing Apple documents may be a little more complicated.
Mac
The macOS platform has a built-in electronic signature tool called the “Markup” feature. This can be used to e-sign documents quickly and effortlessly from an iPhone, iPad, or MacBook. Certain file types, like Word or Excel, might be tougher to sign.
iPhone / iPad
iPhones and iPads are Apple platforms that run on macOS, just like MacBooks. Signing online documents is easy and convenient, thanks to additional features like document scanning.
You can turn a physical copy of a form into a digitally signed document in seconds. However, certain Windows-based document types won’t be as easily signed.
Android
Android is a mobile-based platform for non-Apple smartphones such as Samsung. Web-browser-based electronic signature solutions can be used with these devices. Specific Android apps can also be leveraged.
Other Platforms
Other potential platforms exist, such as Linux. As long as alternatives have internet access, you can sign something electronically.
Step 2: Define the Type of Document Where the Digital Signature Will Be Placed
The second step is to define the document’s format. This will influence the e-signature method used in step three. There’s a wide variety of document types, just as numerous platforms.
The most common format is PDF. It can be used on essentially all platforms. The Word format exists on Windows and Android operating systems. Excel is in the same Microsoft Office Suite. Google Docs is a cloud-based equivalent of Microsoft Word.
Below, we’ll go over each document type in more detail.
PDF — Portable Document Format — is the most common document type used across all platforms. They can be electronically signed with every device, including smartphones, computers, tablets, Macs, and PCs.
Word
Word is a Windows format for the Microsoft Word application. This document type is a little harder to sign for most platforms, particularly macOS systems. Electronic signatures can be added if you have access to an internet browser.
Google Docs
Google Docs is the Google Suite equivalent of Microsoft Word, and a Google Doc is the file format/type. They can be electronically signed as long as you can access an internet browser. Some electronic signature tools can sign Google Docs as well.
Excel
The Excel format is a file type for the Microsoft Excel application. These are spreadsheets that can be accessed through the app. As long as you have a Windows operating system, you can e-sign Excel documents. Android devices can also be used to sign Excel spreadsheets.
Other Types of Documents
Other document types can be signed with the signature solutions provided in step 3.
Step 3: Select a Suitable Signature Method for the Defined Platform and Document Type
Now that you’ve identified your platform and document type, you must identify an appropriate signature solution.
There are several options available, but not all of them will be suitable for your unique situation. For instance, signing a Word document with an Apple app wouldn’t work well.
Below, we’ll outline all the potential solutions available.
1. Use an Electronic Signature Tool
An electronic signature tool is one of the easiest and best ways to sign a document online. This is a cloud-based app that makes adding e-signatures to any form of document a breeze.
This is an ideal signature method for any document workflows — from small businesses to enterprises. This strategy is effective because it can be applied to nearly every platform and document type. It simplifies an otherwise complicated process.
How to Sign Something Electronically With Signaturely
SIgnaturely is an electronic signature tool that makes signing online documents easy. It’s free and easy to use, and by using it, you’ll be able to streamline your document workflow. This will save you and your organization time, effort, and money.
Signing any document is simple with Signaturely. Here’s a step-by-step visualization:
1. Sign in to Signaturely, or Create an Account
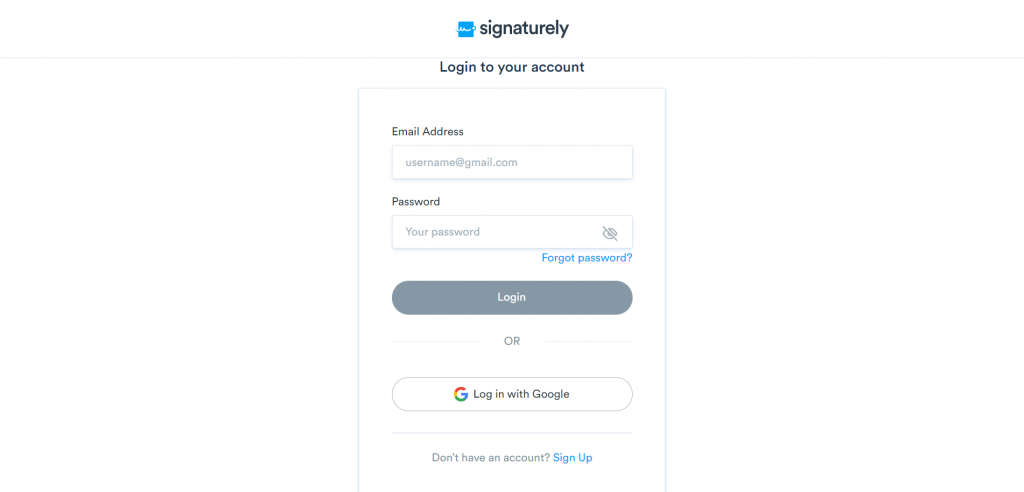
The first step to take is to sign in to Signaturely. You’ll need an account if you don’t already have one. It’s free to register.
2. Select the Right ”Who Needs to Sign?” Option for Your Document
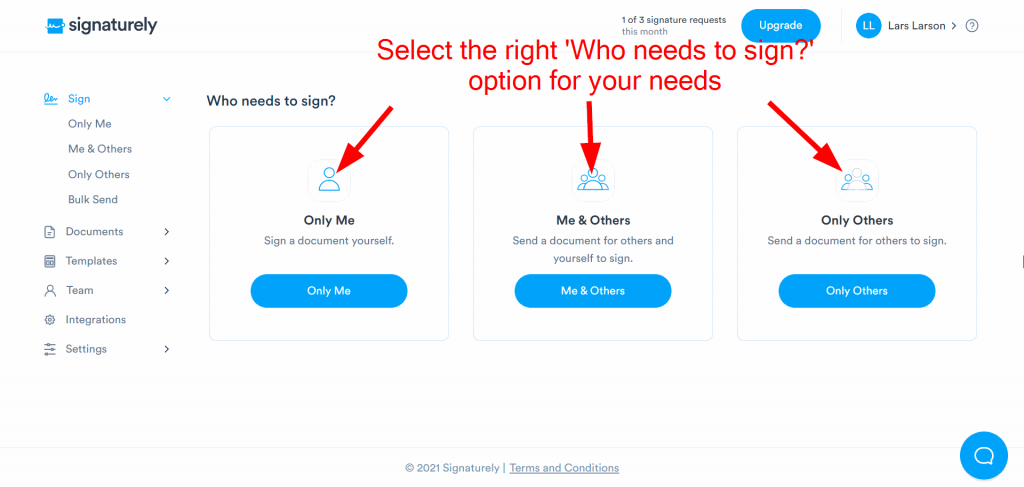
After signing in to your Signaturely account, you should automatically land on a page with three options to choose from:
- Only Me
- Me & Others
- Only Others
If your document needs only your own signature, then the “Only Me” setting is what you need to select. If you also need another person’s signature, select “Me & Others.”. Lastly, the “Only Others” option is necessary if you’re preparing the document solely for others to sign.
3. Upload Your Document File
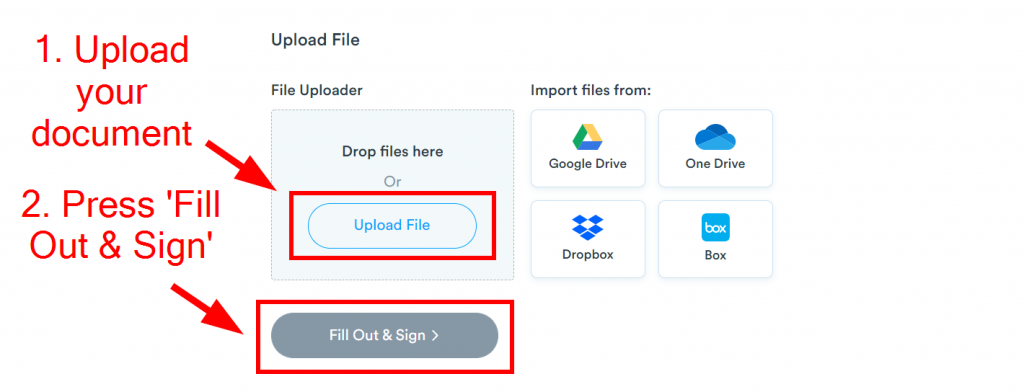
After selecting the right option in step two, you’ll be taken to a document preparation page. Scroll down until you find the “Upload File” section. This is where you’ll attach your document.
After finding and attaching your document file, wait until it loads, and press “Fill Out & Sign.”
4. Add Your Electronic Signature With the Editor
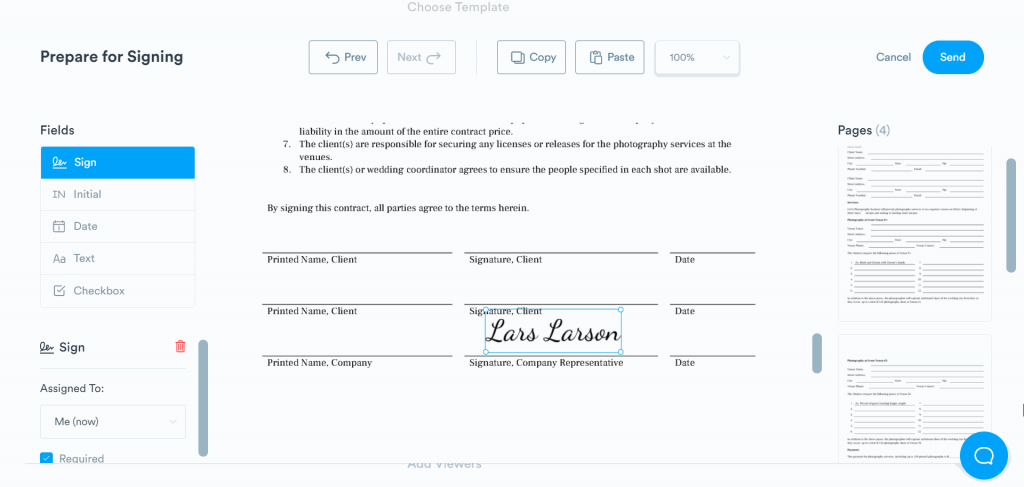
After following step three, you’ll be sent to a digital editor. You can add your e-signature to your document and other required information here.
Once you’ve completed adding all the appropriate information to your document, press “Send” in the top right corner. After doing this, your completed document will be sent to your Signaturely inbox, where you can download it.
2. Use a Digitally Drawn Signature
In some instances, a digitally drawn signature makes sense. This can be achieved with an electronic signature, an Adobe, or an Apple app. All the solutions in this article allow you to draw your e-signature, which can be done with a stylus to achieve accuracy.
Alternatively, you can create a high-quality PNG image of your signature with Adobe Photoshop or Illustrator. A PNG image is a transparent image that you can overlay on any documents you need to have signed.
3. Use an Adobe Application
Another e-signature solution is to use an Adobe application. There are three general options you could potentially use to sign something electronically:
3.1 Adobe Acrobat Reader
Adobe Acrobat Reader is Adobe’s easy-to-use, free PDF reader and editor. It makes electronically signing PDF documents a breeze. The signature can be typed, drawn, or inserted as an image. Additional information can also be added, like names and dates.
Here’s a run-through of how you can use Adobe Acrobat Reader to add an online signature to a PDF:
- Open your PDF document
- Select the “Sign” button located to the far right of the toolbar

- A new page will appear. Select the “Fill and Sign” option
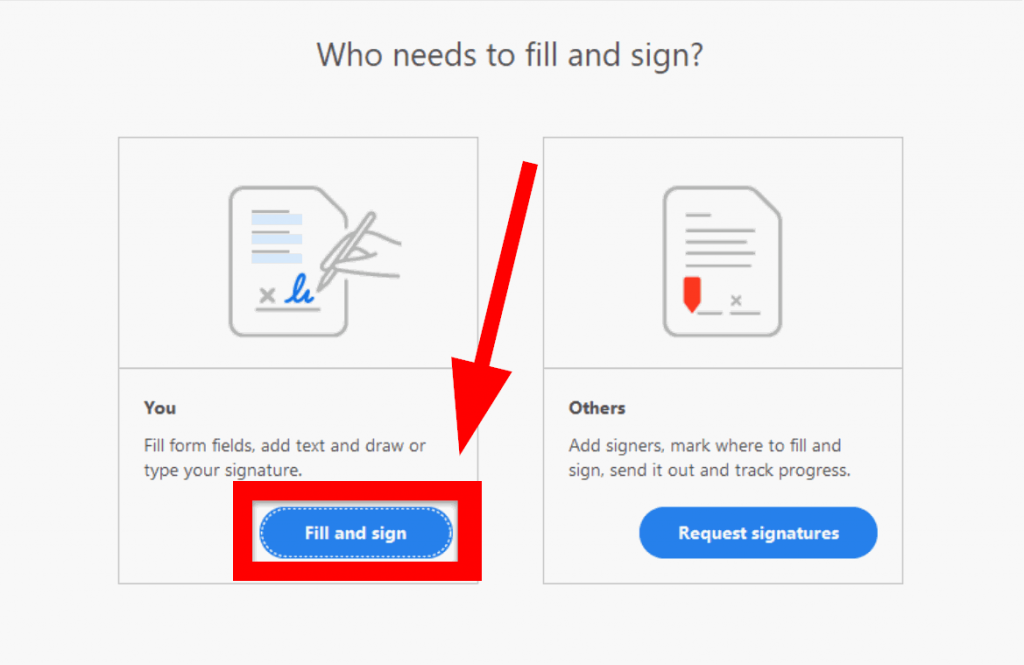
That’s all there is to it. The page after will have everything you need to add an e-signature to your document. You can use text for your signature or draw it.
3.2 Adobe Fill & Sign
Adobe Fill & Sign is a free web application that allows you to sign PDF documents online. You can upload a file and add your electronic signature if you can access a web browser.
Here’s a step-by-step explanation of how this works:
- Start by heading to the Adobe Fill & Sign webpage
- Press “Select a file” to attach your PDF document
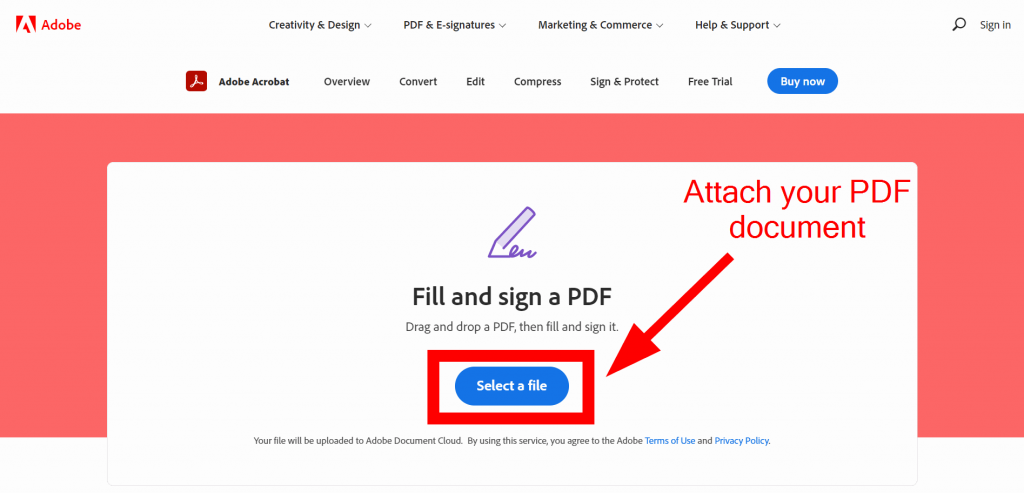
- After the PDF document has loaded, sign in to your Adobe account
- If you don’t have an account, register one for free
- You’ll be sent to an editor where you can sign the PDF document
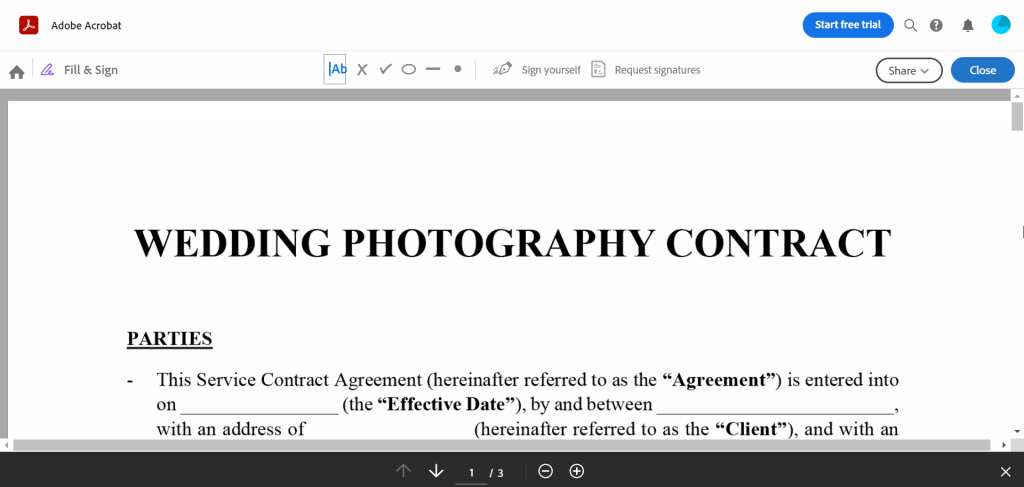
You can also add any other required pieces of information.
3.3 Adobe Mobile
Lastly, you can download the Adobe Fill & Sign mobile app if you’re using a smartphone platform. It allows you to take a picture of a physical document, which can be signed immediately. You can instantly send it to any others required to sign.
You can also download documents from your emails, sign them, then send them back. Your e-signature can be drawn with your finger or stylus, or it may be typed. Here’s a tutorial if you don’t want to deal with any Adobe apps.
4. Use an Apple App
Another electronic signature solution you could utilize is an Apple application. These are most suited to those using macOS platforms like Mac, iPhone, and iPad.
There are two basic Apple apps you could use:
4.1 Apple Preview
The Preview app is an image and PDF viewer that can fill out and sign PDF documents. It’s a default, vendor-supplied application compatible with all macOS platforms. If you’re using a MacBook, iPhone, or iPad, you can use this to sign PDFs.
These are the steps required to fill out and sign a PDF document on macOS:
- Open your PDF document in the Preview app
- Tap/click on any form field you want to fill out
- To sign the document, look for the Markup icon
When pressing the Markup icon, you can type out your signature or draw it.
4.2 Apple Mail
Like Apple Preview, Apple Mail is a default application on all macOS platforms. Whether you’re using an iPad, iPhone, or MacBook, this app can help you sign something electronically. It uses the Markup feature to do so.
To take advantage of this app for e-signing documents, follow these steps:
- Open the Mail app
- Create a new email, or reply to one you’ve received
- Press “Insert Photo or Video or Add Attachment”
- Find your document
- Press the Markup icon to fill out and e-sign your document
- Attach the document to your email and hit send
How to Electronically Sign Something: Conclusion
If you’re reading this, you know how to sign any document electronically. This will help you and your organization save time, effort, and money. Your document workflow will be much more efficient, increasing operational efficiency across all departments.
To briefly recap, we outlined a three-step process to assist you in signing any potential documents. These include:
- Choosing a platform
- Identifying your document format/type
- Selecting an appropriate digital signature solution/method
Follow the guidelines in this article, and you’ll be able to sign anything electronically.
Want to save time, effort, and money signing documents online? Sign up for a free Signaturely account today.
